Using "Input" to build a simple publish application
There are many "input" script in EZoApp, but for the first time users, they might just use it for text note purpose, cannot handle it appropriately. So now we emphasize the "input" script, also we will use the built-in EZoApp database for push function, to demonstrate a simple push services.
Let's make a text-input example first. The procedure as below: At the beginning there is an input field, when I enter text, and press send, the text you just entered will show up below, the input field will be empty at the same time.
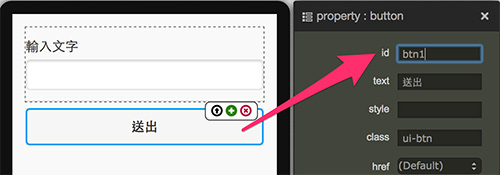
First step, pull out the text-input window on the screen, and change the id column to "text1"

Then pull out another button window, and change the id column to "btn1"
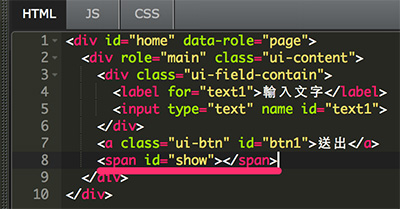
Following step is add "span" program code in HTML program for text display area.
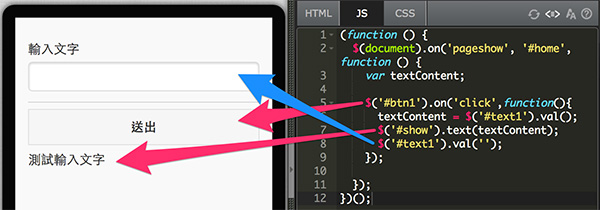
After complete the above step, we can edit the javascript, start with the main program and add content program.
(function () {
  $(document).on('pageshow', '#home', function () {

  });
})();
This content is beginning to declare a variable, when you press the button, the value of the field incoming variable, then make the "span" using the text mode to show up this variable, and then using val ('') to empty the field in the end.
var textContent;

$('#btn1').on('click',function(){
  textContent = $('#text1').val();
  $('#show').text(textContent);
  $('#text1').val('');
});
Please check the preview as below link ( http://jqmdesigner.appspot.com/designer.html#&ref=5684417573945344 )
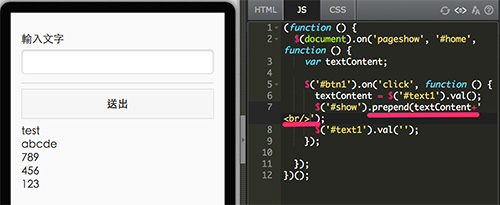
If you replace "text" with "prepend" and add "br" in the end, the text you input will move to the front and line feed.
( http://jqmdesigner.appspot.com/designer.html#&ref=5633612070256640 )
It will move to the rear while replace "text" with "append"
( http://jqmdesigner.appspot.com/designer.html#&ref=5741275424751616 )

After understanding the first example, now we have an extension one. We add one new action:「press "enter" for sending」. It is easy to make this. We just use on('click',function(){}), and now we try to add keypress, then determine keyCode=13 (This is the value of the enter key on the keyboard) sending
( http://jqmdesigner.appspot.com/designer.html#&ref=6322695750811648 )
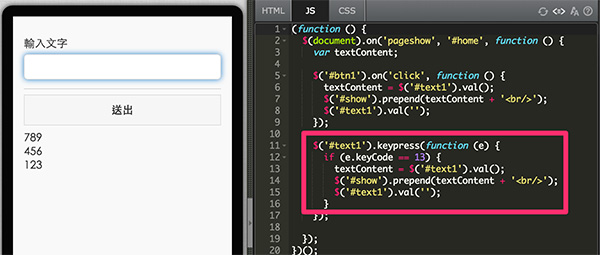
$('#text1').keypress(function (e) {
  if (e.keyCode == 13) {
    textContent = $('#text1').val();
    $('#show').prepend(textContent + '<br/>');
    $('#text1').val('');
  }
});
Third Example:「When you input in the text box, it will show up immediately below the text box, also there is a button to empty the text box」. Due to the real-time display, so we need to combine the event with "text-input" fields, when you press your finger off the keyboard (keyup), it will automatically pass the value to "span" and display it. ( http://jqmdesigner.appspot.com/designer.html#&ref=5730739064668160 )
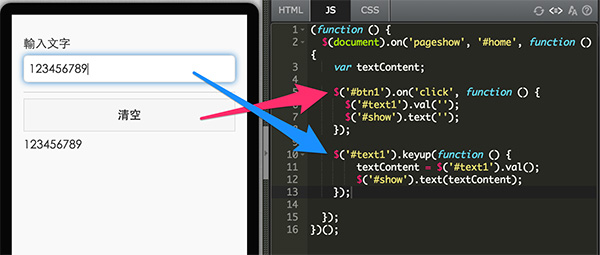
$('#btn1').on('click', function () {
  $('#text1').val('');
  $('#show').text('');
});

$('#text1').keyup(function () {
  textContent = $('#text1').val();
  $('#show').text(textContent);
});
Finally, let us practice what we learn, also combined with the built-in EZoApp database to setup an action:「After you enter the name and text, all the people will receive the content at once」.
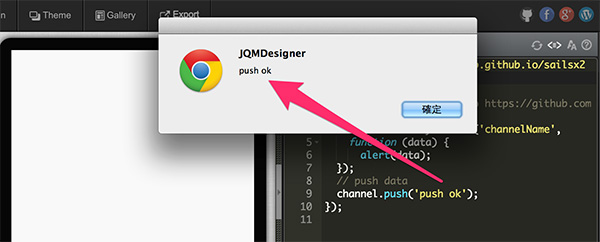
Let us take a look at the push function first, go to javascript page at program edit, while you press "push" then "alt + /" button, default program code will pop up then press "preview". When you see "push ok" pop up screen, which means "push" script functional. ( http://jqmdesigner.appspot.com/designer.html#&ref=5131226859962368 )
$.getScript('http://ezoapp.github.io/sailsx2/assets/modelPush.js',
  function () {
  var channel;  // refer to https://github.com/ezoapp/sailsx2
  channel = new MyChannel('channelName',
    function (data) {
      alert(data);
  });
  // push data
  channel.push('push ok');
});
Let me explain the program code here. At the beginning we can ignore "getScript", and load an external "push js", the "function" means that while there is a value (data) into the database then push the "data". After a successful alert (data) push, input channel.push information to database, which can be an array, objects or strings. "Channel" should match up channelName, only the same channelName can be received the same push message.
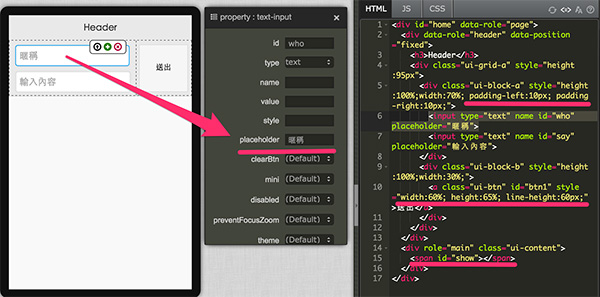
After that we can try to use the "text-input" example, change the "html" first, and add it into "header", also add "grid" into "header", set two fields, then change the width. ( http://jqmdesigner.appspot.com/designer.html#&ref=5710926850293760 )
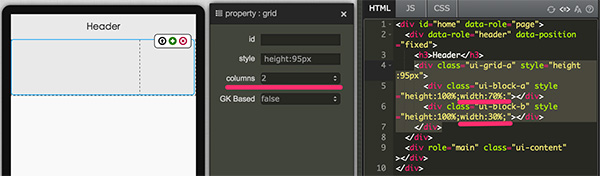
Then add two separate "inputs" and buttons in "grid", also make some adjustments for it, remember to add "span" to the bottom, then we can set the input attributes "placeholder", now you can make a default text for "input". After click the "input" and start typing text, it will disappear.
( http://jqmdesigner.appspot.com/designer.html#&ref=6257126766804992 )
After complete the HTML, now we can start edit javascript, combine the two script editing, and set "say" & "who" these two variables, and then press the button. The value of the input were passed within these two variables and combine the variables arrays passed to "channel.push". At the same time empty the contents of "say" script, after sending an array into "channel.push", add "prepend" script into it, finally it will appear one by one!
( http://jqmdesigner.appspot.com/designer.html#&ref=5928719071838208 )
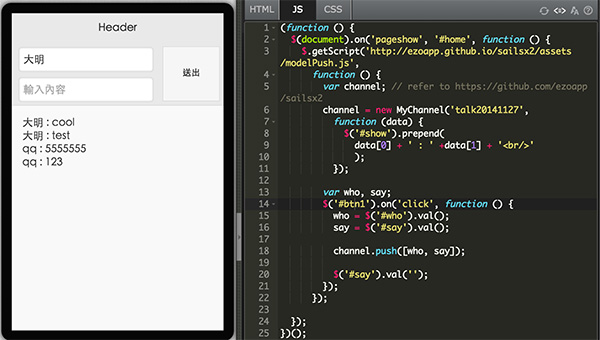
(function () {
  $(document).on('pageshow', '#home', function () {
    $.getScript('http://ezoapp.github.io/sailsx2/assets/modelPush.js',
      function () {
        var channel;  // refer to https://github.com/ezoapp/sailsx2
        channel = new MyChannel('talk20141127',
          function (data) {
            $('#show').prepend(
              data[0] + ' : ' +data[1] + '<br/>'
            );
          });

        var who, say;
        $('#btn1').on('click', function () {
          who = $('#who').val();
          say = $('#say').val();

          channel.push([who, say]);

          $('#say').val('');
        });
      });

  });
})();
This is the complete tutorial of EZoApp. If you want to continue reading, you can Return to Table of Contents. If you have any questions, you can email them to: [email protected]. The EZoApp team is always here to serve you.