CHAPTER 15 – Linking JSON
In the chapters about components, we mentioned that some of them link to JSON data but did not give detailed explanations on how to use them. Of course, if you know AJAX, you could go ahead and use them without any problems. Nevertheless, in this chapter, we will introduce how to link EZoApp's components with APIs. First, let us drag-and-drop a json-listview component onto the design screen. We can see that it generates both HTML and JS code. Let us look at the HTML first: (Example: http://jqmdesigner.appspot.com/designer.html#&ref=6237338208305152)
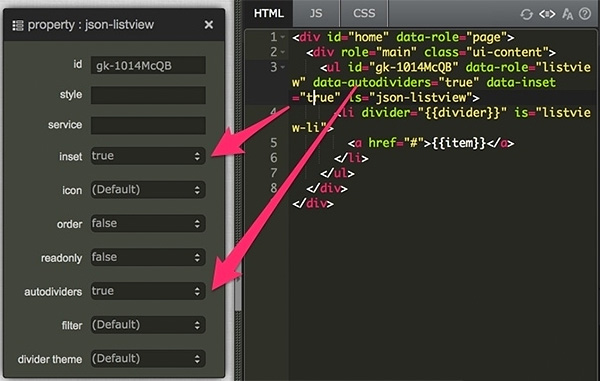
<ul id="gk-1014McQB" data-role="listview" data-autodividers="true" data-inset="true" is="json-listview">
  <li divider="{{divider}}" is="listview-li">
    <a href="#">{{item}}</a>
  </li>
</ul>
The id in the code was generated automatically; data-role defines this as a listview component; data-autodividers and data-inset are jQuery mobile functions. You can also see true and false option settings; they are used to determine whether the listview should have a divider or display the full version. The "{{divider}}" and "{{item}}" in the li underneath are where the JSON data you provide will go. Thus, if the data names are different, you should make changes here. Of course, you add new "{{ }}" to enter additional data.
Note the "is" here. This is indicates that this is a "gk component", which means it can use gk-component's API. (Actually, you should have noticed that current mainstream web components are all using is.)
Next, let us look at the JS code:
$(document).on("pageinit", "#home", function () {
  var $ele = $("#gk-1014McQB"),
    url = $ele.attr("service");
  if (url) {
    $.getJSON(url).complete(function (data) {
      $("#gk-1014McQB").gk("model", $.parseJSON(data.responseText));
    });
  }
});
Gosh! Why did it generate a bunch of stuff that I don't understand!? Relax. First, we saw "$(document).on("pageinit", "#home", function ( )" earlier when we talked about jQuery Mobile events. This is just an action to be executed when the page is loaded for the first time. "$ele = $("#gk-1014McQB")" declares the whole ul as a variable (to make it easier to control). As for "url = $ele.attr("service");", it is used to retrieve the service value in the property panel; i.e., the URL of our JSON.
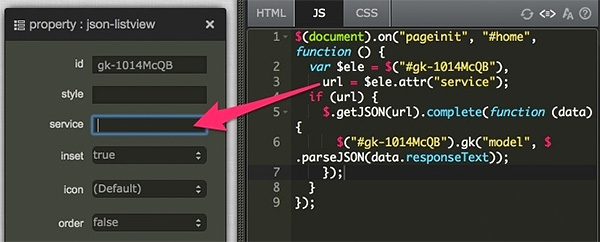
So, this section basically confirms this JSON does exist. Next, it uses the URL to execute getJSON; if successful, it then executes gk-component's API. (For the API, refer to: https://github.com/ezoapp/Learn-GK-Components/blob/master/docs/GKComponent-json-listview.md)
Because simply reading JSON from the frontend requires going across domains, we will try this out with a made-up JSON. However, because I am writing it in the code directly, so I will hide some JS first then add my own JSON data.
$(document).on("pageinit", "#home", function () {
var $ele = $("#gk-1014McQB");
// url = $ele.attr("service");
// if (url) {
// $.getJSON(url).complete(function (data) {
// $("#gk-1014McQB").gk("model", $.parseJSON(data.responseText));
// });
// }
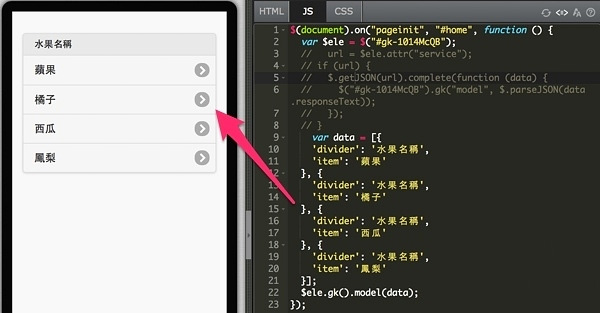
var data = [{
'divider': 'Name of fruit',
'item': 'Apple'
}, {
'divider': 'Name of fruit',
'item': 'Orange'
}, {
'divider': 'Name of fruit',
'item': 'Watermelon'
}, {
'divider': 'Name of fruit',
'item': 'Pineapple'
}];
$ele.gk().model(data);
});
Click on Preview and you will discover that JSON data is already added in the listview. So far, we have only written just this line- "$ele.gk().model(data);"
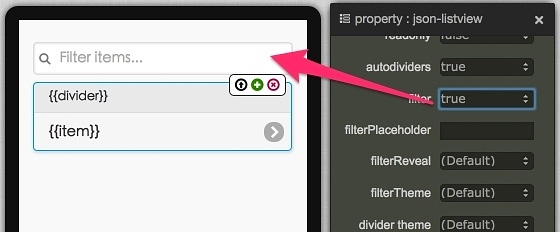
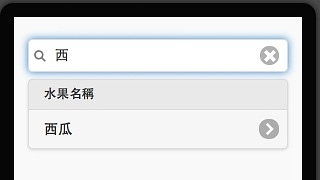
In addition, we can add a filter box at the top by using the filter setting in the property panel. The filter box allows us to filter the data quickly.
Of course, in addition to the divider, we can add a href value. The HTML looks like this:
<a href="{{url}}" target="_blank">{{item}}</a>
Then, add URL to JSON to link it to the corresponding Chinese Wikipedia (維基百科) page:
var data = [{
  'divider': 'Name of fruit',
  'item': 'Apple',
  'url':'http://goo.gl/bezuPw'
}, {
  'divider': 'Name of fruit',
  'item': 'Orange',
  'url':'http://goo.gl/nzUuYU'
}, {
  'divider': 'Name of fruit',
  'item': 'Watermelon',
  'url':'http://goo.gl/zLVGv4'
}, {
  'divider': 'Name of fruit',
  'item': 'Pineapple',
  'url':'http://goo.gl/LKLSCe'
}];
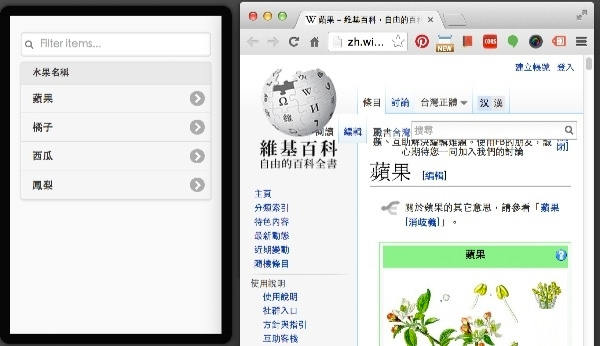
Last, preview the result. Click an item and it will open a new window to display the corresponding Chinese Wikipedia (維基百科) page! (Example: http://jqmdesigner.appspot.com/designer.html#&ref=4833423122235392)
After you understand the operation principles above, we can really work with JSON now. Of course, we need to have a web space to store JSON data first. I put the fruit JSON on the web myself, and then used EZoApp to read it. Nevertheless, your browser needs to allow cross-domain. I used Chrome myself. You can install this small cross-domain kit Allow-Control-Allow-Origin: *. Click it and you can do cross-domain now!
Cross-domain not enabled:

The icon turns green when cross-domain is enabled:

After cross-domain is enabled, just fill the JSON URL in the service box. Click Preview and you are done! (Example: http://jqmdesigner.appspot.com/designer.html#&ref=4833423122235392)

Continue reading CHAPTER 16 - Create Apps by Linking to Government Open Data
Or Return to Table of Contents