CHAPTER 22 - 串接 flickr 做最新照片 App
前一篇看完了利用 picasa 做海賊懸賞單的 App,這篇就要來看跟 picasa 一樣頗負盛名的網路相簿 flickr,不過要用 RSS 串 flickr 就沒有 picasa 來得方便,雖然 flickr 有提供 API,但要申請金鑰才能使用,而這篇的重點也是在於讓大家簡單的就可以串接相簿,所以還是以 RSS + imggallery 為主。
完成範例:http://jqmdesigner.appspot.com/designer.html#&ref=5739257494765568
要串 flickr 就一定要先來它的官方網站瞧瞧,由於在這裡不用他的 API,所以看到 feed 的部分:https://www.flickr.com/services/feeds/

如果不清楚它在講什麼也沒關係,最重要的就是這串網址:https://api.flickr.com/services/feeds/photos_public.gne ,只要有公開在 flickr 上的相片或相簿,就都可以用這串網址得到相對應的 RSS,不過呢,裡面卻有很多眉眉角角需要留心。
最需要注意的眉角就是『使用者的 id』,先隨便找個攝影師的個人資料,好吧就是這個外國人了:http://www.flickr.com/photos/sunsward7/ 從該攝影師的相片集可以發現,不論是網址的 sunsward7 或自訂的 Sunsword & Moonsabre,其實都不是真正的 flickr id,真正的 id 可以從程式碼裡面搜尋「N0」大概就可以找到,真正的 id 就是 44912907@N05 ,而且你還可以直接從裡頭發現這也是 RSS 的網址 ( 很神奇的是,你在網頁裡找不到,不過程式碼裡頭卻有 ),https://www.flickr.com/services/feeds/photos_public.gne?id=44912907@N05&format=rss_200這串就是 RSS 的網址,可以看到 user id 就在裡頭。( 如果不想這樣找,也可以利用這個網站找 flickr 的使用者 id:http://idgettr.com/ )

為了證實,就要讓 EZoApp 和 flickr 串起來試試看,跟串 picasa 同樣的做法,我們要結合 RSS 元件部分的程式碼與 imggallery 元件,幾乎同樣的做法,輕輕鬆鬆串起 RSS。
$(document).on("gkComponentsReady", function (w) {
  var $ele = $("#flickr"),
    a, content,title,
    img = [],
    rss = 'https://www.flickr.com/services/feeds/photos_public.gne?id=44912907@N05&format=rss_200',
    url = 'https://ajax.googleapis.com/ajax/services/feed/load?v=1.0&num=500&callback=?&q=' + encodeURIComponent(rss);
  $.ajax({
    type: "GET",
    url: url,
    dataType: "json",
    error: function (e) {
      console.log('oh no');
    },
    success: function (e) {
      a = $(e);
      num = a[0].responseData.feed.entries.length;
      content = a[0].responseData.feed.entries[0].mediaGroups[0].contents[0].url;
      title = a[0].responseData.feed.entries[0].mediaGroups[0].contents[0].title;
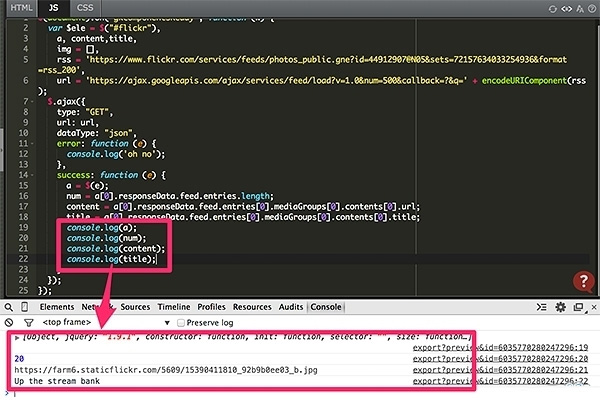
      console.log(a);
      console.log(num);
      console.log(content);
      console.log(title);
    }
  });
});

完成後就要讓 imggallery 吃這些資料,先修改一下 HTML,主要只是調整樣式,以及給予一個 id 叫 flickr:
<div id="flickr" is="imggallery" style="background-color:#fafafa;width:100%;margin:0 auto;">
  <div style="width:90px; height:90px; overflow:hidden; border:3px solid #ccc; display:inline-block;margin:1px;">
    <a href="#imgpage" data-transition="slide">
      <img data-src="{{data-src}}" style="width:100%; min-height:100%;">
    </a>
</div>
然後再在 JS 裡頭加上一個 function,圖片網址餵給 imggallery。
    function imggallery(num) {
      for (var i = 0; i < num; i++) {
        img.push({
          "data-src": a[0].responseData.feed.entries[i].mediaGroups[0].contents[0].url,
          "title": a[0].responseData.feed.entries[i].mediaGroups[0].contents[0].title
        });
      }
      if (img.length >= num) {
        console.log(img);
        $ele.gk("model", img);
      }
    }
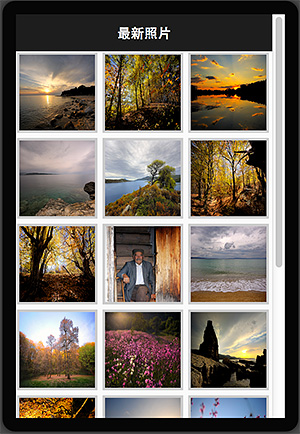
預覽一下,就可以看到相片都以正方形的排列出現了,如果看不到圖可能是因為照片更新,不過也不用緊張,因為最後的範例是抓最新的照片。( 點選 preview 預覽:http://jqmdesigner.appspot.com/designer.html#&ref=5766302165630976 )

接著就是點選放大圖的效果,基本上和 picasa 的做法一模一樣,先建立一個名為 imgpage 的頁面,然後建立兩個全域變數,點選圖片的時候將圖片網址與名稱帶給全域變數,imgpage 在 pageshow 的時候讀取變數就完成囉!
HTML:
<div id="imgpage" data-role="page" is="page">
  <div data-role="header" data-position="fixed" data-theme="b">
    <h3>圖片資訊</h3>
    <a class="ui-btn ui-btn-left ui-icon-back ui-btn-icon-notext ui-corner-all" data-rel="back">Button</a>
  </div>
  <div role="main" class="ui-content" is="content">
    <h4 style="font-size:12px; margin:5px 10px;">123</h4>
  </div>
</div>
javascript:
var imgsrc, imgtitle;
$(document).on("gkComponentsReady", function (w) {
  var $ele = $("#flickr"),
    a, content, title,
    img = [],
    rss = 'https://www.flickr.com/services/feeds/photos_public.gne?id=44912907@N05&format=rss_200',
    url = 'https://ajax.googleapis.com/ajax/services/feed/load?v=1.0&num=500&callback=?&q=' + encodeURIComponent(rss);
  $.ajax({
    type: "GET",
    url: url,
    dataType: "json",
    error: function (e) {
      console.log('oh no');
    },
    success: function (e) {
      a = $(e);
      num = a[0].responseData.feed.entries.length;
      content = a[0].responseData.feed.entries[0].mediaGroups[0].contents[0].url;
      title = a[0].responseData.feed.entries[0].mediaGroups[0].contents[0].title;
      console.log(a);
      console.log(num);
      console.log(content);
      console.log(title);
      imggallery(num);
    }
  });

  function imggallery(num) {
    for (var i = 0; i < num; i++) {
      img.push({
        "data-src": a[0].responseData.feed.entries[i].mediaGroups[0].contents[0].url,
        "title": a[0].responseData.feed.entries[i].mediaGroups[0].contents[0].title
      });
    }
    if (img.length >= num) {
      console.log(img);
      $ele.gk("model", img);
    }
    $ele.find('a').on('click', function () {
      var aIndex = $(this).parent('div').index();
      imgsrc = $(this).find('img').attr('src');
      imgtitle = img[aIndex].title;
      console.log(imgtitle);
      console.log(imgsrc);
    });
  }
});
(function () {
  $(document).on('pageshow', '#imgpage', function () {
    $('#imgpage .ui-content').append('<img src="' + imgsrc + '" style="width:100%;"/>');
    $('#imgpage h4').text(imgtitle);
  });
})();
(function () {
  $(document).on('pageshow', '#home', function () {
    $('#imgpage .ui-content').find('img').remove();
    $('#imgpage h4').text('');
  });
})();
不過很可惜的,flickr 只提供了最新 20 張照片的 rss,除非使用它的 API 才可以真正串接相簿、上傳照片或留言,但在這次的介紹不會介紹詳細的 flickr,如果有強烈只需要 RSS 做相簿應用的朋友,就可以先使用 picasa 囉!如果只是想追蹤某個攝影師的相片動態,就可以使用 flickr,反正做法幾乎一樣啦!
( 完成範例:http://jqmdesigner.appspot.com/designer.html#&ref=5705807014395904 )
